►LCD InitializationBefore
using the LCD for display purpose, LCD has to be initialized either by
the internal reset circuit or sending set of commands to initialize the
LCD. It is the user who has to decide whether an LCD has to be
initialized by instructions or by internal reset circuit. we will dicuss
both ways of initialization one by one.
Initialization by internal Reset CircuitAn
internal reset circuit automatically initializes the HD44780U when the
power is turned on. The following instructions are executed during the
initialization. The busy flag (BF) is kept in the busy state until the
initialization ends (BF = 1). The busy state lasts for 10 ms after VCC
rises to 4.5 V.
- Display clear
- Function set:
DL = 1; 8-bit interface data
N = 0; 1-line display
F = 0; 5 x 8 dot character font
- Display on/off control:
D = 0; Display off
C = 0; Cursor off
B = 0; Blinking off
- Entry mode set:
I/D = 1; Increment by 1
S = 0; No shift
Note:
If the electrical characteristics conditions listed under the table
Power Supply Conditions Using Internal Reset Circuit are not met, the
internal reset circuit will not operate normally and will fail to
initialize the HD44780U. For such a case, initial-ization must be
performed by the MCU as explained in the section, Initializing by
Instruction.
As mentioned in the Note, there are
certain condtions that has to be met, if user want to use initialization
by internal reset circuit. These conditions are shown in the Table 5
below.

Table 5: Power Supply condition for Internal Reset circuit
Figure 7 shows the test condition which are to be met for internal reset circuit to be active.
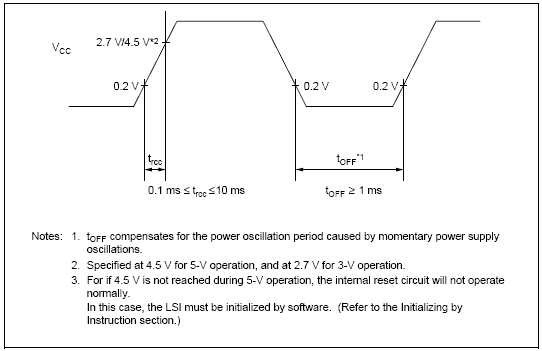
Figure 7: Internal Power Supply reset
Now
the problem with the internal reset circuit is, it is highly dependent
on power supply, to meet this critical power supply conditions is not
hard but are difficult to achive when you are making a simple
application. So usually the second menthod i.e. Initialization by
instruction is used and is recommended most of the time.
Initialization by instructionsInitializing
LCD with instructions is really simple. Given below is a flowchart that
describles the step to follow, to initialize the LCD.
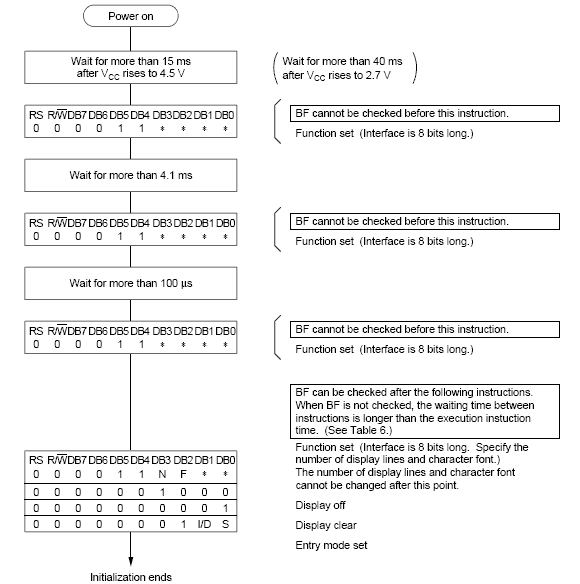
Figure 8: Flow chart for LCD initialization
As you can see from the flow chart, the LCD is initialized in the following sequence...
1) Send command 0x30 - Using 8-bit interface
2) Delay 20ms
3) Send command 0x30 - 8-bit interface
4) Delay 20ms
5) Send command 0x30 - 8-bit interface
6) Delay 20ms
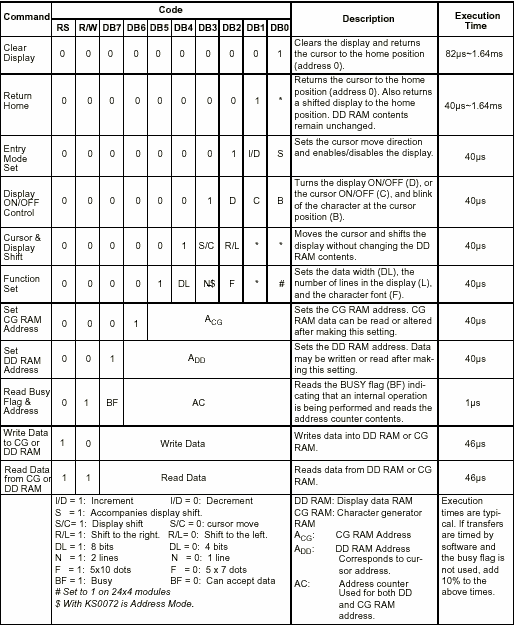
7) Send Function set - see Table 4 for more information
8) Display Clear command
9) Set entry mode command - explained below
The
first 3 commands are usually not required but are recomended when you
are using 4-bit interface. So you can program the LCD starting from step
7 when working with 8-bit interface. Function set command depends on
what kind of LCD you are using and what kind of interface you are using
(see Table 4 in
LCD Command section).
LCD Entry modeFrom Table 3 in command section, you can see that the two bits decide the entry mode for LCD, these bits are:
a) I/D - Increment/Decrement bit
b) S - Display shift.
With these two bits we get four combinations of entry mode which are 0x04,0x05,0x06,0x07 (see table 3 in
LCD Command
section). So we get different results with these different entry modes.
Normally entry mode 0x06 is used which is No shift and auto
incremement. I recommend you to try all the possible entry modes and see
the results, I am sure you will be surprised.
Programming example for LCD Initialization
CODE:
LCD_data equ P2 ;LCD Data port
LCD_D7 equ P2.7 ;LCD D7/Busy Flag
LCD_rs equ P1.0 ;LCD Register Select
LCD_rw equ P1.1 ;LCD Read/Write
LCD_en equ P1.2 ;LCD Enable
LCD_init:
mov LCD_data,#38H ;Function set: 2 Line, 8-bit, 5x7 dots
clr LCD_rs ;Selected command register
clr LCD_rw ;We are writing in instruction register
setb LCD_en ;Enable H->L
clr LCD_en
acall LCD_busy ;Wait for LCD to process the command
mov LCD_data,#0FH ;Display on, Curson blinking command
clr LCD_rs ;Selected instruction register
clr LCD_rw ;We are writing in instruction register
setb LCD_en ;Enable H->L
clr LCD_en
acall LCD_busy ;Wait for LCD to process the command
mov LCD_data,#01H ;Clear LCD
clr LCD_rs ;Selected command register
clr LCD_rw ;We are writing in instruction register
setb LCD_en ;Enable H->L
clr LCD_en
acall LCD_busy ;Wait for LCD to process the command
mov LCD_data,#06H ;Entry mode, auto increment with no shift
clr LCD_rs ;Selected command register
clr LCD_rw ;We are writing in instruction register
setb LCD_en ;Enable H->L
clr LCD_en
acall LCD_busy ;Wait for LCD to process the command
ret ;Return from routine
Now we can do the same thing in C, I am giving example using Keil C. Similar code can be written for SDCC.
CODE:
#include <AT89X51.H>.
#define LCD_data P2
#define LCD_D7 P2_7
#define LCD_rs P1_0
#define LCD_rw P1_1
#define LCD_en P1_2
void LCD_init()
{
LCD_data = 0x38; //Function set: 2 Line, 8-bit, 5x7 dots
LCD_rs = 0; //Selected command register
LCD_rw = 0; //We are writing in data register
LCD_en = 1; //Enable H->L
LCD_en = 0;
LCD_busy(); //Wait for LCD to process the command
LCD_data = 0x0F; //Display on, Curson blinking command
LCD_rs = 0; //Selected command register
LCD_rw = 0; //We are writing in data register
LCD_en = 1; //Enable H->L
LCD_en = 0;
LCD_busy(); //Wait for LCD to process the command
LCD_data = 0x01; //Clear LCD
LCD_rs = 0; //Selected command register
LCD_rw = 0; //We are writing in data register
LCD_en = 1; //Enable H->L
LCD_en = 0;
LCD_busy(); //Wait for LCD to process the command
LCD_data = 0x06; //Entry mode, auto increment with no shift
LCD_rs = 0; //Selected command register
LCD_rw = 0; //We are writing in data register
LCD_en = 1; //Enable H->L
LCD_busy();
}
With the
help of the above code, you are able to initialize the LCD. Now there is
a function/subroutine coming in the code i.e. LCD_busy, which is used
to put delay for LCD so that there should not be any command or data
sent to the LCD untill it finish executing the command. More on this
delay routine is explained in the next section.
 ]
]
 [/lightbox]
 [/lightbox]
 [/lightbox]